Pici
Doughs: Sauces:
 What they are
Rustic, hand-rolled spaghetti from Siena, but also found elsewhere in Tuscany by a dozen other names. Pici are springy and toothsome—made with just flour (usually 00, but sometimes semola and sometimes both), water, olive oil, and a little elbow grease—more akin to Japanese udon than the spaghetti from the box. This one’s for the kids, too; the soft dough and long noodles welcome little helping hands.
What they are
Rustic, hand-rolled spaghetti from Siena, but also found elsewhere in Tuscany by a dozen other names. Pici are springy and toothsome—made with just flour (usually 00, but sometimes semola and sometimes both), water, olive oil, and a little elbow grease—more akin to Japanese udon than the spaghetti from the box. This one’s for the kids, too; the soft dough and long noodles welcome little helping hands.
How they’re traditionally served With fried breadcrumbs (con le briciole); ragù, particularly duck (con la nana) or wild boar (al cinghiale); cacio e pepe; garlic-spiked tomato sauce (all’aglione).
MAKE THE DOUGH Make your dough of choice and let it rest, tightly covered, at room temperature for 1 hour—a completely relaxed dough will make for easier rolling.
SET UP YOUR WORKSPACE Dust a sheet pan with semolina or line it with a dry dishcloth. Gather your tools. Pour a little olive oil into a small bowl.
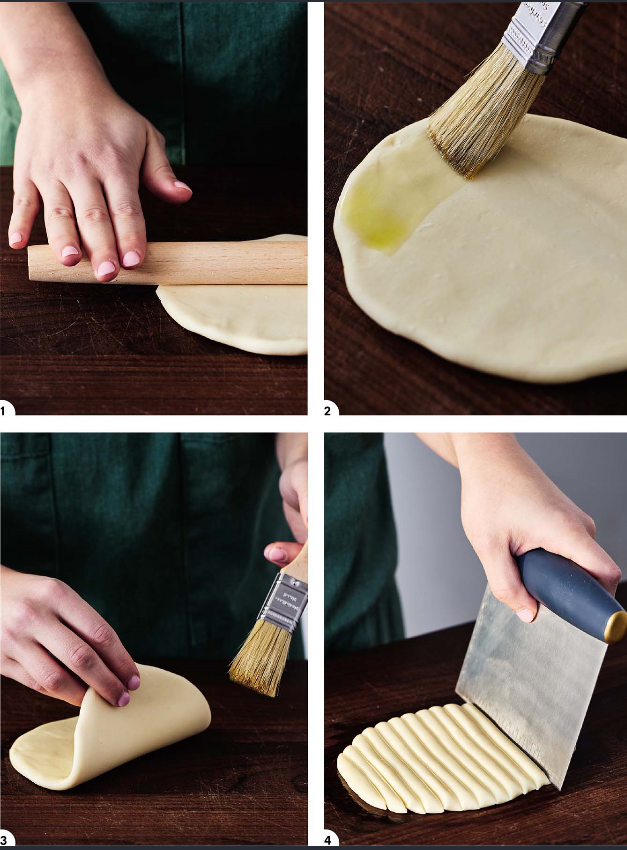
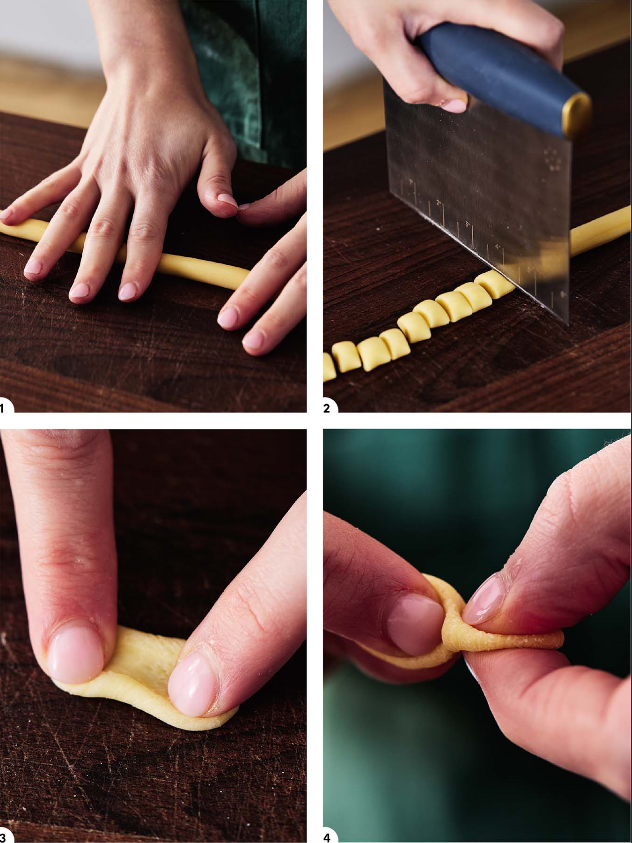
ROLL, OIL, AND CUT THE DOUGH Cut off a quarter of the dough and keep the rest covered. Flatten the dough with the palm of your hand into a rough oval. With a rolling pin (or wine bottle), roll the dough into a ¼-inch (6-mm) thick slab, about the thickness of pita bread.
With a pastry brush or your fingers, coat the dough completely in a thin layer of olive oil—get the front, back, and edges. This will prevent the surface from drying out and cracking.
Use a bench scraper or sharp knife to slice the dough into strips roughly ¼ inch (6 mm) wide. They will all be different lengths.
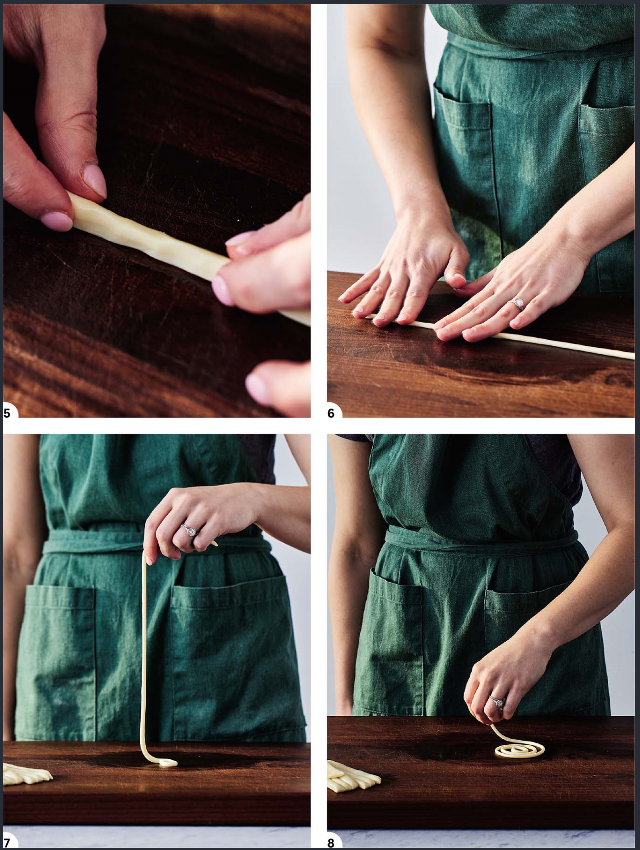
MAKE THE PICI Position one of the strips horizontally on your work surface and move the other pieces to the side. Pinch the sides of the strip upward so it’s more cylindrical. Then, starting in the center, use your fingers to roll the strip of dough into a thin strand—first back and forth, until the surface is smooth, and then outward in opposite directions, eventually making your way toward the ends. The goal is a strand that’s 2 to 3 mm thick.
Repeat the process with the remaining strips, and then the remaining dough. If the pieces start to dry and crack on the surface as you roll, add a touch more olive oil. If any of them break, don’t sweat it—now you have two!
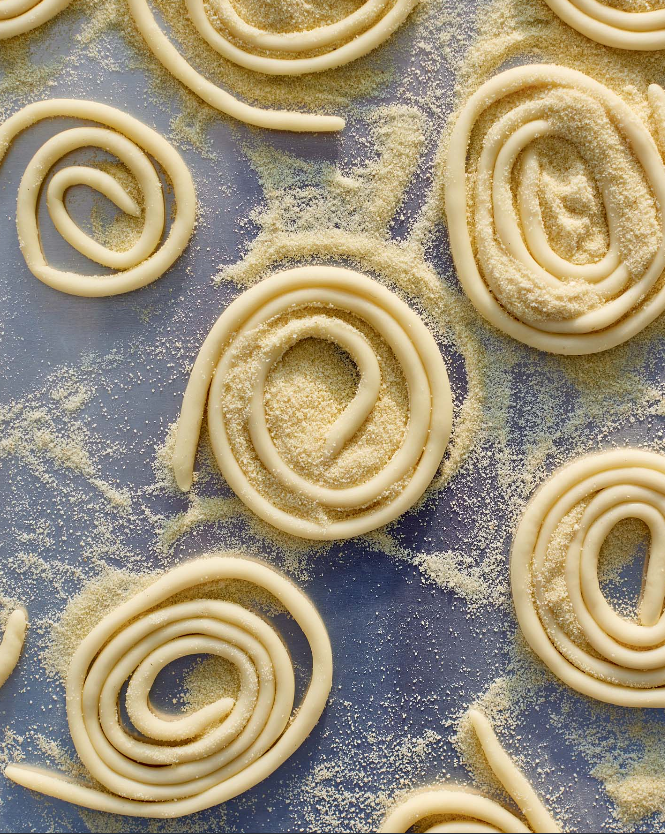
COOK OR STORE THE PASTA If cooking the pasta shortly after shaping, coil the finished strand into a loose spiral, making sure there’s a little space between the concentric circles, and place it on the prepared sheet pan (you can also line them up in a row). If storing for future use, dust each strand in semolina on the sheet pan before coiling and freeze the pasta.
Cook the pici until tender but with some bite, 3 to 5 minutes, depending on their thickness.
Lagane
Doughs: Sauces:
What they are An ancient pasta, perhaps the most ancient, even referenced by the Roman poet Horace himself. Wide and rustic, lagane have bite, which makes them a welcome accompaniment to thick, hearty sauces and soups. Durum wheat and water-based, you’ll find them in the south, particularly around Calabria, Basilicata, Puglia, and Campania. Their robustness means they’re easy to roll with a pin, though you can, of course, use a pasta machine, too.
How they’re traditionally served With hearty sauces and soups, particularly chickpeas and other legumes.
MAKE THE DOUGH Make your dough of choice and let it rest, tightly covered, at room temperature for 30 minutes to 1 hour—a more relaxed dough will make for easier rolling.
SET UP YOUR WORKSPACE Dust a sheet pan with semolina or line it with a dry dishcloth. Gather your tools. Set up your pasta machine if you plan to use one.
ROLL THE DOUGH INTO A SHEET Cut off a quarter of the dough and keep the rest covered.
Roll the dough by hand: With a rolling pin, roll the dough into a thin rectangle—it doesn’t matter if the shape is uneven. You’re aiming for 2 mm thick, but do the best you can. It’s helpful to do this on a wooden surface to keep the pasta from sticking; if you don’t have one, dust the sheet with 00, all-purpose, or semola flour as needed.
Or, roll the dough with a pasta machine: Roll the dough into a semi-thin sheet, stopping at setting 4 for both the Marcato Atlas 150 and KitchenAid machines. If the dough is at all sticky, or the sheet starts to tear on the surface, dust both sides with a little flour.
If you have the space, roll out the remaining sections of dough—the finished sheets can dry a bit; no need to cover.
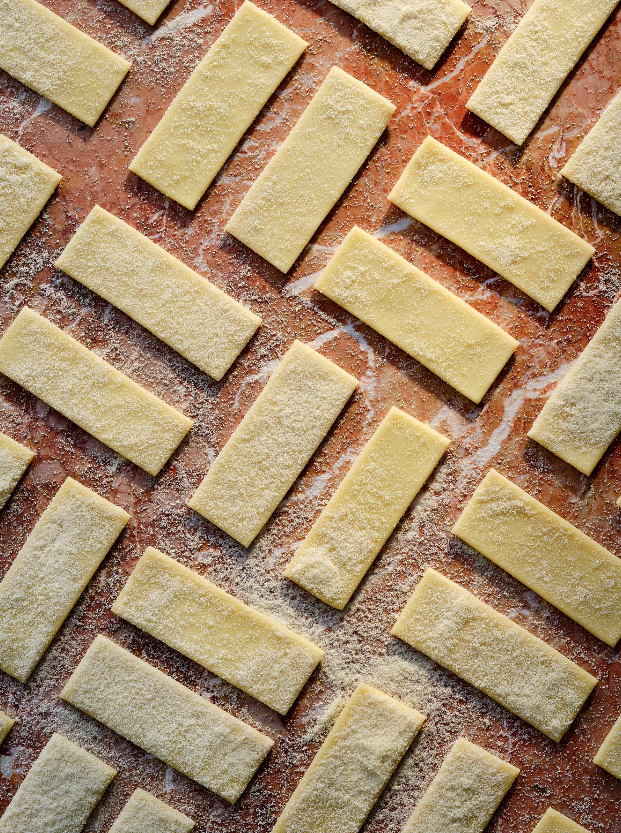
CUT THE LAGANE Cut the sheets into stout strips, 1 inch (2.5 cm) wide and 3 inches (7.5 cm) long. Arrange the pieces on the prepared sheet pan in a single layer or, if you need to stack or freeze them, sprinkle semolina between each layer and shake it off before cooking.
COOK OR STORE THE PASTA Cook the lagane either in boiling water or soup until tender but with some bite, 2 to 4 minutes.
Strozzapreti
Doughs: Sauces:
What they are A medieval-era pasta from central Italy that always makes me smile. The name means “priest stranglers” and they take many forms, from the short twists here to gnocchi-like dumplings made with spinach and other greens.
Strozzapreti have several origin stories. One tells of a priest gone hunting without food or supplies. Ravenous upon returning home for dinner, he swallowed his pasta whole and started to choke, saved only when a merciful servant struck him in the back. Another is a story of spite: In centuries past, the Catholic church rented much of its land to farmers, and as a form of payment, the priests demanded the farmers’ wives prepare pasta for them. Angered by their greed, the farmers wished the priests would choke on their wives’ creations! Whatever the truth may be, this pasta—brought to life by loose, spontaneous movement—reminds me of the beauty of imperfection.
How they’re traditionally served With various local sauces depending on the form, and particularly tomato and seafood sauces.
MAKE THE DOUGH Make your dough of choice and let it rest, tightly covered, at room temperature for 1 hour—a completely relaxed dough will make for easier rolling.
SET UP YOUR WORKSPACE Dust a sheet pan with semolina or line it with a dry dishcloth. Gather your tools. Set up your pasta machine if you plan to use one.
ROLL THE DOUGH INTO A SHEET Cut off a quarter of the dough and keep the rest covered.
Roll the dough by hand: With a rolling pin, roll the dough into a thin disc or rectangle—it doesn’t matter if the shape is uneven. You’re aiming for about 1.5 mm thick but do the best you can. It’s helpful to do this on a wooden surface to keep the pasta from sticking; if you don’t have one, dust the sheet with 00, all-purpose, or semola flour as needed.
Or, roll the dough with a pasta machine: Roll the dough into a semi-thin sheet, stopping at setting 5 for both the Marcato Atlas 150 and KitchenAid machines. If the dough is at all sticky as it goes through the machine, or the sheet starts to tear on the surface, dust both sides with a little flour. CUT THE SHEET INTO STRIPS Cut the pasta sheet into 1-inch (2.5-cm) wide ribbons; it’s totally fine if they’re different lengths.
MAKE THE STROZZAPRETI Position one end of each ribbon in the center of your non-dominant palm. Pinch the top a little to help get a grip and then, starting with the fingertips of your free hand, roll the dough upward quickly and lightly until your fingertips meet and the ribbon twists on itself to form a rustic spiral (the motion is like rubbing your hands together when they’re cold). To make longer strozzapreti, reposition your hands at the end of the twist and repeat the motion once more. Pinch off the twisted portion and continue the motion until the strip is gone. The length of the strozzapreti will depend on the size of your hand, but in general they’ll be 2 to 4 inches (5 to 10 cm) long. They’ll all look different, and that’s the beauty of it!
Arrange the finished strozzapreti in a single layer on the prepared sheet pan. Repeat with the remaining ribbons, and then the remaining dough.
COOK OR STORE THE PASTA Cook the strozzapreti until tender but with some bite, 3 to 5 minutes, depending on their thickness.

Corzetti della Valpolcevera
Doughs: Sauces:
What they are I had to include this lesser-known pasta shape because 1) it’s very beginner- (and kid-) friendly, and 2) it’s just that fun to make. Like corzetti stampati, their more popular medallion-shaped cousins (here), these corzetti hail from Genoa, and particularly the Val Polcevera area, where they’re served during holidays and special occasions. I was introduced to this pasta by my friend and food historian Karima Moyer-Nocchi, who showed me the variations described here. I encourage you to try them all and pick your favorite.
How they’re traditionally served With a slow-cooked meat sauce called tuccu or with mushrooms.
MAKE THE DOUGH Make your dough of choice and let it rest, tightly covered, at room temperature for 30 minutes to 1 hour.
SET UP YOUR WORKSPACE Dust a sheet pan with semolina or line it with a dry dishcloth. Gather your tools.
ROLL THE DOUGH INTO A ROPE Cut off a slice of dough, about the width of one or two fingers. Keep the rest covered.
Roll the dough into a rope, a generous ½ inch (1.25 cm) thick (about the thickness of a Sharpie marker): Start in the center and use your fingers or the palms of your hands to roll the dough, first back and forth, until the surface is smooth, and then outward in opposite directions, eventually making your way toward the ends. If the dough slides and it’s difficult to get a grip, wet your hands a little and try again. The rope does not need to be perfectly even.
CUT THE ROPE INTO PIECES Cut the rope into scant ½-inch (1.25-cm) pieces, so they’re slightly narrower than they are tall.
MAKE THE CORZETTI Shape the corzetti using one or a mix of the following methods:
Method 1: Position a nugget of dough so the longer sides run horizontally on your work surface and the cut sides are top and bottom. Line up your two index fingers so they’re touching in the center of the dough. Press down and pull your fingers outward in opposite directions until the center is thinner than the ends. It’ll look like a figure 8.
Method 2: Position a nugget of dough so the longer sides run horizontally on your work surface and the cut sides are top and bottom. Press one index finger into half of the dough’s surface to anchor it. Then, with the other index finger, press down and stretch the other half of the dough outward until it looks like a figure 8.
Method 3 (my personal favorite): In the same horizontal orientation, hold half of the nugget between one thumb and index finger positioned front and back. Hold the other half of the nugget between the other thumb and index finger positioned top and bottom. It should remind you of a chain link. Simultaneously press the dough firmly between your fingers on each side so one half is flattened horizontally, like a pancake, and the other half is flattened upright. It’ll look like a twisted figure 8.
Arrange the finished corzetti in a single layer on the prepared sheet pan. Repeat with the remaining pieces, and then the remaining dough. You can leave the pasta uncovered at room temperature until you’re done and for up to 5 hours.
COOK OR STORE THE PASTA Cook the corzetti until tender but with some bite, 3 to 5 minutes, depending on size and drying time.
Cavatelli
Doughs: Sauces:
What they are Widely considered one of the oldest pastas, cavatelli and their many iterations appear throughout southern Italy. The name means “little hollows,” and their seashell-like caves, made by dragging a nugget of dough with one, two, or even ten fingers, are excellent sauce-grabbers. Some are smooth on the outside, others are rolled across carved surfaces for texture, and all invite creativity—a zester, cheese grater, or sushi mat are all potential cavatelli makers. As with anything new, the first try might be tricky, but I assure you the technique quickly becomes familiar and you’ll wonder how you never knew making pasta could be so simple.
How they’re traditionally served With everything from turnip greens, broccoli, or arugula and fresh tomatoes (Puglia), to pork sausage ragù (Molise), to broccoli rabe or king trumpet mushrooms (Basilicata), to ‘nduja and Tropea onions (Calabria), to eggplant, tomatoes, and ricotta salata (Sicily).
MAKE THE DOUGH Make your dough of choice and let it rest, tightly covered, at room temperature for 20 to 30 minutes.
SET UP YOUR WORKSPACE Dust a sheet pan with semolina or line it with a dry dishcloth. Gather your tools.
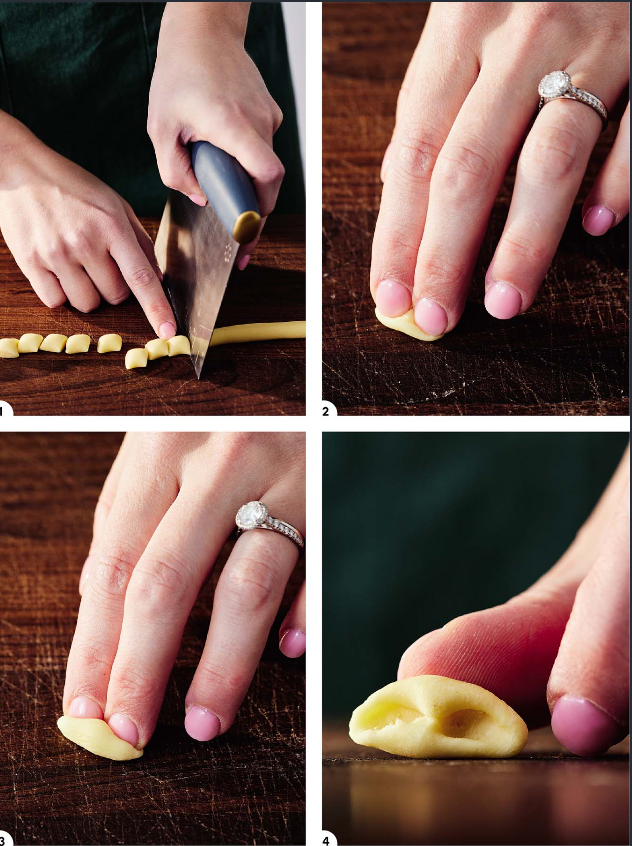
ROLL THE DOUGH INTO A ROPE Cut off a slice of dough, about the width of one or two fingers. Keep the rest covered.
Roll the dough into a rope, a scant ½ inch (1.25 cm) thick (about the thickness of a Sharpie marker): Start in the center and use your fingers or the palms of your hands to roll the dough, first back and forth, until the surface is smooth, and then outward in opposite directions, eventually making your way toward the ends. If the dough slides and it’s difficult to get a grip, wet your hands a little and try again. The rope does not need to be perfectly even.
CUT THE ROPE INTO PIECES Cut the rope into ½-inch (1.25-cm) pieces, about the size of chickpeas.
MAKE THE CAVATELLI For smooth cavatelli, place your index and middle fingers at the top edge of one of the dough nuggets (the orientation of the dough doesn’t matter, though I usually position the cut sides horizontally). Firmly press down, then drag the dough toward you, with generous pressure, until it curls over and forms a little cave. Don’t be shy; you want to feel tension between your fingers and the dough. The more pressure you use, the hollower it will be, and the more sauce the pasta can grab.
If you’re unhappy with the results (perhaps it’s very thick, or smeared across the board), smush it into a little ball and try again. But don’t get bogged down in the details because each piece is meant to be unique.
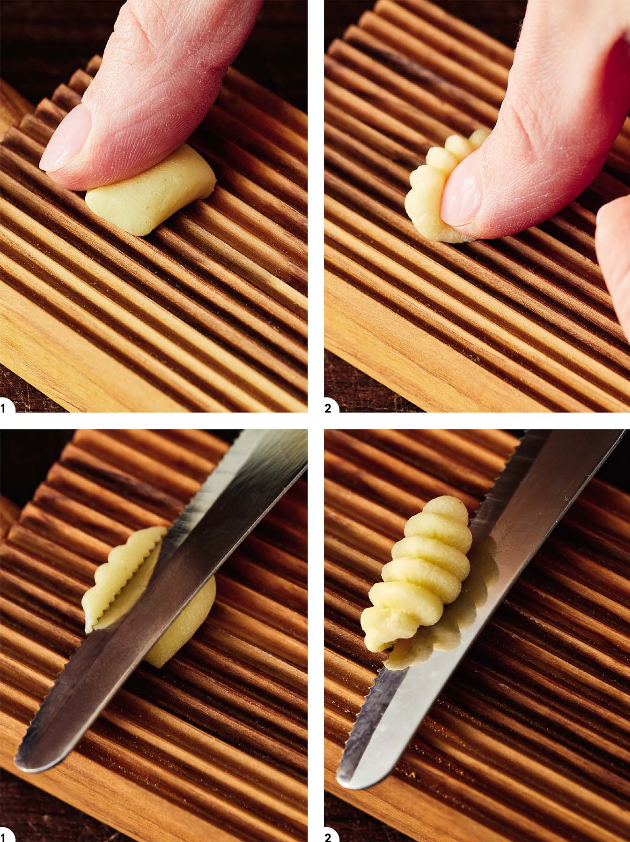
To use a gnocchi board or other textured surface, position a nugget of dough near the edge of the board closest to you (near the handle, if it has one). Then press the side of your thumb into the near edge of the dough and push it away from you, with firm pressure, until it curls over once and is deeply imprinted with ridges on the outside. If you prefer, use the serrated edge of a table knife or the blade of a bench scraper to drag the dough across the board instead, like spreading butter on bread (some find this option easier, and more satisfying).
Note: The most obvious choice is to roll the dough across the back of a fork. You can absolutely do this, but in my house a fork doesn’t provide a long enough “runway” to fully roll the pasta, resulting in denser dumplings.
Arrange the finished cavatelli in a single layer on the prepared sheet pan. Repeat with the remaining pieces, and then the remaining dough. You can leave the pasta uncovered at room temperature until you’re done, for up to 5 hours.
COOK OR STORE THE PASTA Cook the cavatelli until tender but with some bite, 3 to 5 minutes, depending on their thickness and drying time.
Capunti
What they are Pasta peapods that hail from the south, particularly Puglia and Basilicata. The name means “dug into,” referring to the deep dimples your fingers leave behind for sauce to pool. Identical in technique to smooth-surfaced cavatelli, capunti similarly range from small segments called capuntini to long, eight-fingered canoes. They’re sometimes infused with saffron or whole wheat flour, though a green dough really brings the peapod look to life.
How they’re traditionally served With king trumpet mushrooms and sausage, or with tomato and meat sauces.
MAKE THE DOUGH Make your dough of choice and let it rest, tightly covered, at room temperature for 20 to 30 minutes.
SET UP YOUR WORKSPACE Dust a sheet pan with semolina or line it with a dry dishcloth. Gather your tools.
ROLL THE DOUGH INTO A ROPE Cut off a slice of dough, about the width of one or two fingers. Keep the rest covered.
Roll the dough into a rope, a generous ¼ inch (6mm) thick (a little thicker than a pencil): Start in the center and use your fingers or the palms of your hands to roll the dough, first back and forth, until the surface is smooth, and then outward in opposite directions, eventually making your way towards the ends. If the dough slides and it’s difficult to get a grip, wet your hands a little and try again. The rope does not need to be perfectly even.
CUT THE ROPE INTO PIECES Cut the rope into roughly 1½-inch (4-cm) pieces, or just long enough to fit your three middle fingers across.
MAKE THE CAPUNTI Position a piece of dough horizontally on your work surface and place your three middle fingers across its length. Firmly press down, digging your fingertips into the dough, then drag it toward you with firm pressure in a single, confident motion. The dough might flip over or it might not, but either way you should leave behind three deep dimples.
If you’d like, drag the dough across a gnocchi board, cavarola board, or other textured surface (as described in the cavatelli instructions).
Arrange the finished capunti in a single layer on the prepared sheet pan. Repeat with the remaining pieces, and then the remaining dough. You can leave the pasta uncovered at room temperature until you’re done, up to 5 hours.
COOK OR STORE THE PASTA Cook the capunti until tender but with some bite, 3 to 5 minutes, depending on their thickness and drying time.

Malloreddus
What they are Also called gnocchetti sardi (“little Sardinian gnocchi”), malloreddus have much more in common with cavatelli than any potato dumpling. The technique is almost the same as the “little hollows,” though they run smaller and the dough is often turned gold with a pinch of saffron. In centuries past, the signature ribbed exterior was made by rolling the pasta across a wicker basket or textured glass; today, specific paddles with wide wavy ridges are also sold, though a gnocchi board or any of the household items mentioned for cavatelli can be used here, too.
How they’re traditionally served With a tomatoey sausage ragù (alla campidanese); bottarga (cured fish roe) and clams; fresh tomatoes and basil; and often with local sheep’s milk cheeses.