Doughs:
MAKE THE DOUGHS
Make 1 batch of Standard Egg Pasta Dough or Almost All-Yolk Pasta Dough and either a half or full batch of the Colorful Egg Pasta Dough of your choice. (You’ll only need a small amount of colorful dough to create the patterns, but if you prefer to make a full batch, use the leftovers for any egg-based shapes as desired.) Let them rest, tightly covered, at room temperature for 30 minutes
SET UP YOUR WORKSPACE
Gather your tools and set up your pasta machine.
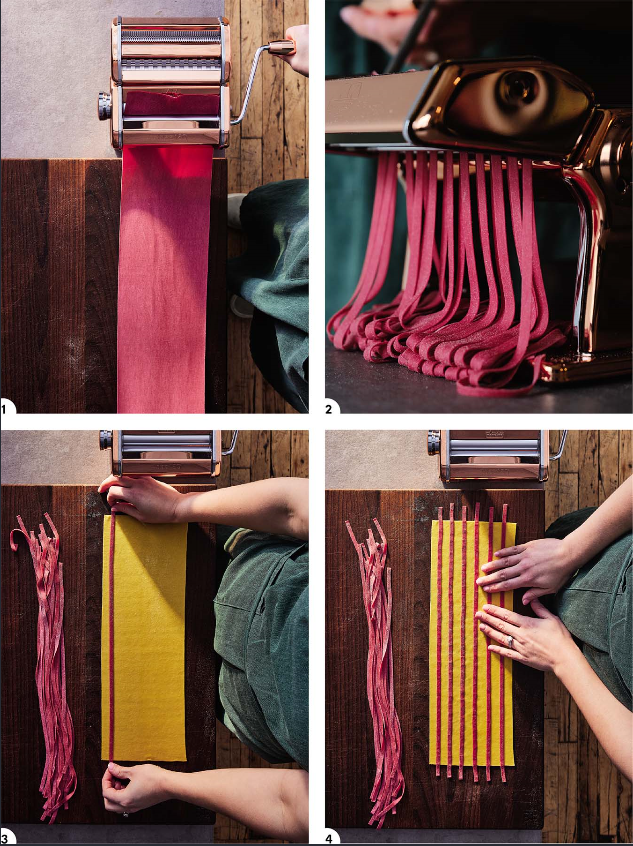
SHEET THE DOUGH
Roll half (of a half-batch) or a quarter (of a full batch) of the colorful pasta dough into a sheet, stopping at setting 6 for both the Marcato and KitchenAid machines. Trim the uneven ends and cut the pasta sheet in half crosswise, or to fit your workspace. Set it out of the way and cover with a dishcloth (if you’re using a countertop, dust the surface with some 00 or all-purpose flour first).
Roll a quarter of the egg pasta dough into a sheet, stopping at setting 6 for both the Marcato and KitchenAid machines. Trim the ends and cut it to the size of the colorful sheet.
CUT THE COLORFUL SHEET
If the colorful sheet feels sticky, dust both sides with a little 00 or all-purpose flour.
For striped pasta: If your pasta machine has a fettuccine and/or tagliolini cutter attachment, feed the colorful sheet through slowly, catching the strands as they pass through the other side. If you prefer to cut the strands by hand, cut it into strips that are ¼ inch (6 mm) wide or thinner.
For polka dots and other designs: Use a small cookie cutter to cut out circles or a knife to cut diamonds or other shapes from the colorful sheet. You can also use thin tagliolini to make a crisscross or other abstract pattern.
CREATE AND SET THE PATTERN
Arrange the colorful strips lengthwise on top of the egg pasta sheet—it’s totally fine if they hang over the edges—or arrange the other shapes in whatever pattern you wish. Use your fingers to press the colorful dough firmly into the egg dough to set the pattern and remove any trapped air.
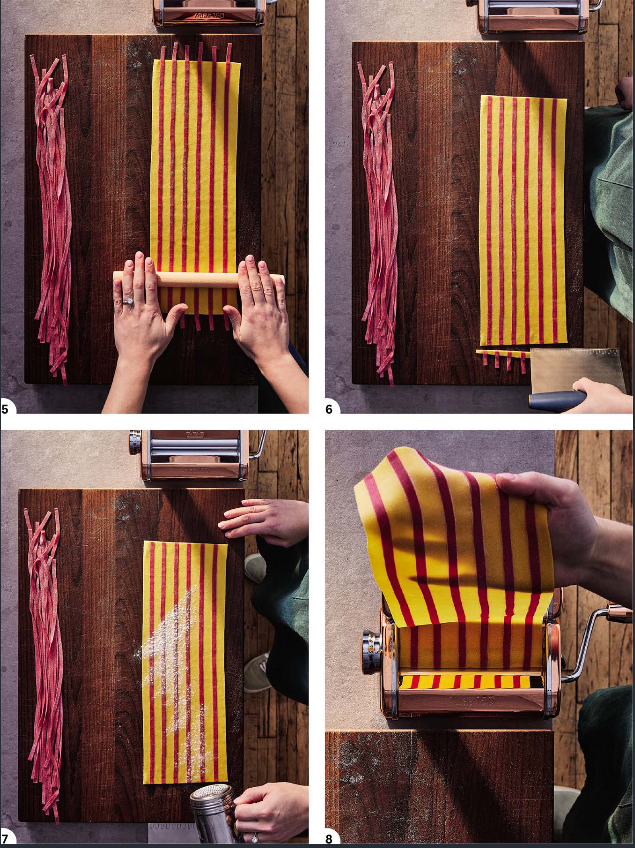
With a rolling pin or wine bottle, gently roll over the entire sheet once or twice to seal the two layers together. Trim away any overhanging strips so you have a neat rectangle.
For striped pasta: If the dough feels sticky, dust both sides of the sheet with a little 00 or all-purpose flour, shaking off any excess. Set the machine back two settings wider (setting 4) and slowly feed the pasta sheet through, then set the machine back to your original setting (6) and roll it through again. If the combined sheet still feels thick, roll it through once more one setting thinner (7).
For polka dots and other designs: Open the machine wider (setting 3) and roll the pasta through once to set the pattern.
Shape the pasta as desired—patterned pasta sheets dry out quickly, so make sure to keep any pieces you’re not immediately using covered with a damp dishcloth or plastic wrap.
VARIATIONS
Two-Toned Pasta Sheets: Make two colorful or other pasta doughs of choice. After resting, roll a quarter of each dough into a thin sheet, stopping on setting 6 for both the Marcato and KitchenAid machines. Then lay one sheet on top of the other and press them together to seal, removing any air pockets. Trim the edges so you have a neat rectangle. Set your pasta machine back two settings wider than you last left it—so, setting 4—and roll the combined sheets through. Then skip to the final setting of the pasta you’re making and roll through once more.
Note: Two-toned pasta looks best with thicker sheets, so I’d recommend fettuccine, pappardelle, garganelli, or corzetti. If you want to use them for sorpresine or farfalle, stop at setting 6 on both machines.
Two-Toned Polka Dots: Follow the instructions for two-toned pasta above but use a small cookie cutter or sharp knife to cut circles—or any shape—out of one of the pasta sheets before overlaying it on top of the other. Set the machine back and roll the pasta through setting 4, then setting 5, to fuse the sheets together.