Doughs:
- Standard Egg Dough
- Almost All-Yolk Dough
- Whole Wheat Egg Dough
- White Wine Dough
- Parsley-Speckled Dough
- Sour Cream & Rye Dough
- Colorful Egg Dough
Filling:
Squares & Rounds
MAKE THE DOUGH AND FILLING
Make your dough and filling of choice. Let the dough rest, tightly covered, at room temperature for 30 minutes, and let the filling chill as needed.
SET UP YOUR WORKSPACE
Dust a sheet pan with semolina or line it with a dishcloth. Gather your tools and set up your pasta machine.
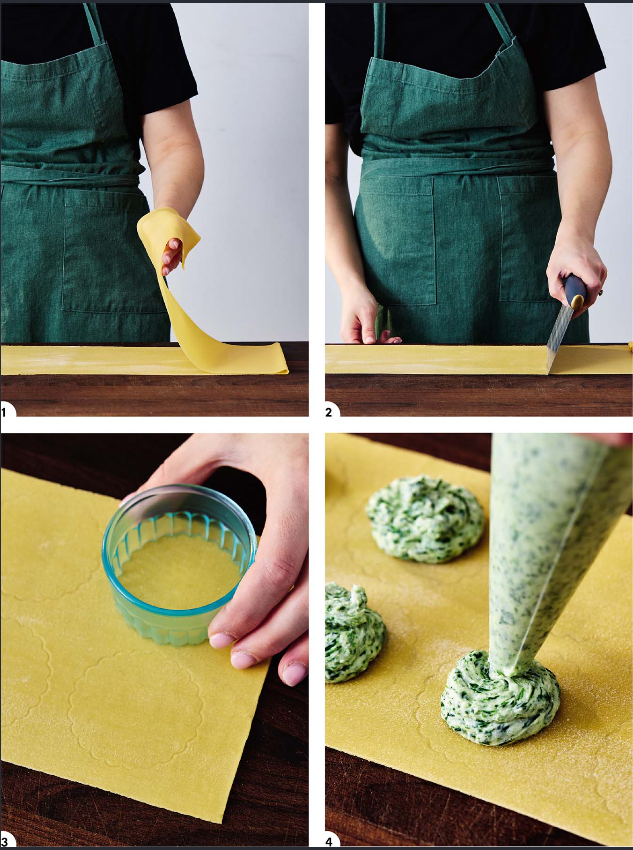
SHEET AND CUT THE DOUGH
Roll a quarter of your pasta dough into a sheet, stopping at setting 6 for a Marcato or setting 7 for a KitchenAid machine.
Lay the pasta sheet horizontally on your work surface—if you’re using a countertop, dust it with some 00 or all-purpose flour first—and trim any uneven edges. Save the scraps for soups or a snack, or ball them up and cover them so they can be reused at the end.
Fold the pasta sheet in half crosswise, like a book, and make a crease to mark the midpoint. Unfold it and cut along the crease so you have two even pieces. Set one aside and cover it with a damp dishcloth or plastic wrap.
FILL THE RAVIOLI
For square ravioli: Position the uncovered pasta sheet horizontally along your work surface. Fold the dough in half lengthwise and make a crease at the midpoint, then unfold it—you should be left with a faint line along the equator designating two rows. Using the crease as a guide, spoon or pipe generous filling dollops, 1 to 2 tablespoons each, across each row at regular intervals, leaving about 1 inch (2.5 cm) of space between each one and the edges of the sheet.
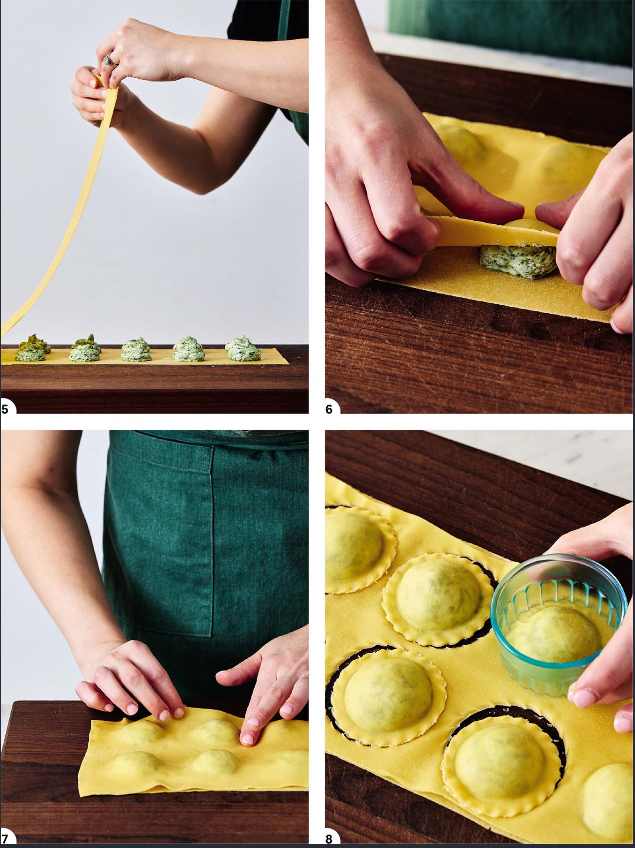
For round ravioli: Gently press a round cookie cutter—I usually use a 2-inch (5-cm) or 2½-inch (6-cm) size—across the uncovered pasta sheet, just enough to see the circles’ outlines but not enough to cut through. Fit as many outlines as possible while leaving a finger’s worth of space between them and the edges of the sheet. Spoon or pipe a dollop of filling in the center of each outline. Add enough to fill the round while leaving ¼ inch (6 mm) of space between the dollop and the outline.
SEAL THE RAVIOLI
If the dough feels dry, dip a finger in a small amount of water and trace around the dollops of filling, or lightly mist the dough with a spray bottle. Uncover the other pasta sheet and carefully lay it on top of the filling (if there’s flour on it, make sure that side is facing up), aligning the two sheets at one edge and draping it over. It’s okay if the top layer doesn’t look like it’ll quite cover everything—you can stretch the dough if needed.
Trace and press your index fingers around each filling pocket to remove the air, lifting the top layer of pasta as needed and pushing the air out toward the nearest edge. Once the mounds of filling are sealed, lift the pasta up to make sure it’s not sticking to your work surface.
To make the ravioli look more uniform, gently press the rim of a small glass or the blunt side of a smaller cookie cutter around each filling pocket. They’ll puff up as the filling concentrates; it’s incredibly satisfying but totally optional.
CUT THE RAVIOLI
For square ravioli: Use a fluted pasta cutter, pasta wheel, or sharp knife to cut lengthwise between the two rows, then crosswise between the filling pockets to create individual squares. Pinch around the edges to seal and thin out the dough. If you don’t have a fluted pasta cutter, press the tines of a fork along the edges for a crimped effect if you’d like.
For round ravioli: Cut out the ravioli with the cookie cutter, twisting it as you do so, then pinch around the edges of each piece to seal and thin out the dough. If the scraps are filling-free and feel pliable and hydrated, ball them up and cover them again. If they’re dry or covered in filling, wipe away the filling and cut them into pieces to save for a snack or soups.
Arrange the finished ravioli in a single layer on the prepared sheet pan. Repeat with the remaining dough and filling.
COOK THE PASTA
Cook the ravioli until tender, 2½ to 3 minutes. For storage options, see here.
Triangles & Half-Moons (Triangoli & Mezzelune)
MAKE THE DOUGH AND FILLING
Make your dough and filling of choice. Let the dough rest, tightly covered, at room temperature for 30 minutes, and let the filling chill as needed. SET UP YOUR WORKSPACE
Dust a sheet pan with semolina or line it with a dishcloth. Gather your tools and set up your pasta machine.
SHEET THE DOUGH
Roll a quarter of your pasta dough into a sheet, stopping at setting 6 for a Marcato or setting 7 for a KitchenAid machine.
Lay the pasta sheet horizontally on your work surface—if you’re using a countertop, dust it with some 00 or all-purpose flour first—and trim any uneven edges. Save the scraps for soups or a snack, or ball them up and cover them so they can be reused at the end.
CUT THE SHEET INTO SQUARES OR ROUNDS
For triangoli: Cut the dough into 2½-inch (6-cm) squares using a bicycle pastry cutter or by hand. For the latter, fold the dough in half lengthwise and make a crease at the midpoint, then unfold it—you should be left with a faint line along the equator designating two rows. Use a fluted pasta cutter, pasta wheel, or sharp knife to cut along the crease. Then cut crosswise to create individual squares (just eyeball it).
For mezzelune: Use a 2½- or 3-inch (6- or 7.5-cm) cookie cutter to cut out as many rounds from the pasta sheet as you can. Any scraps can be reused later if they’re still pliable, or cut into pieces and saved for soup.
FILL THE RAVIOLI
Spoon or pipe dollops of filling, 1 to 2 teaspoons each, in the center of a few squares or rounds, leaving a generous border of dough around them. Cover the rest of the pieces with a damp dishcloth or plastic wrap. If the dough feels dry, add a small amount of water with your finger to two adjoining edges (triangoli) or along half of the round (mezzelune).
SEAL THE RAVIOLI
For triangoli: Fold each square into a triangle, first joining two opposite points, then sealing the sides, gently pressing out the air around the filling as you do so. Once the filling is encased, press the edges firmly between your fingers once more to seal and thin out the dough. If you’d like, press the tines of a fork along the edges for a crimped effect.
For mezzelune: Fold each round into a half-moon, gently pressing out the air around the filling as you do so. Once the filling is encased, press the edges firmly between your fingers once more to seal and thin out the dough.
Arrange the finished pieces in a single layer on the prepared sheet pan. Repeat with the remaining dough and filling.
COOK THE PASTA
Cook the ravioli until tender, 2½ to 3 minutes.